ℹ️ This is the first post in a series on configuring Claude Code. We’ll cover permissions,
CLAUDE.mdand rules, and building custom skills.
The reason we start with permissions - and not CLAUDE.md as you often see - is that permissions (or lack of them) are where the most friction comes from.
What are permissions?
Claude Code is programmed to only perform very few tasks, without first asking for your permission. This means that you will quite often see it ask something like this:
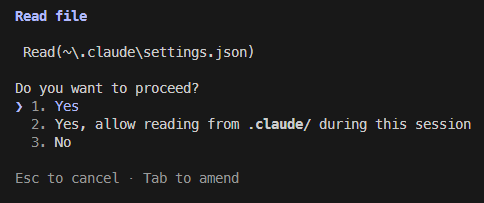
This protects you from unintended actions, but the defaults are restrictive enough to interrupt your flow. You can configure permissions so Claude rarely asks, while still blocking what you don’t want. The simplest way is the “Always allow” option shown above — but it may not be the best.
Where are permissions located?
Permissions are configured in files called settings.json and follows the same structure as everything else in Claude Code. The blog post Anatomy of the .claude/ folder does a great job of describing this (you only have to read the first section). But in short permissions can be set on project level or user level. And for the project level, there is both a tracked and an untracked version, which is quite important if you work in a team. So that is a total of 3 settings files for any given project.
User level
~/.claude/
└── settings.json ← All projects, only you
Project level
your-project/.claude/
├── settings.json ← Specific project, all users
└── settings.local.json ← Specific project, only you
The files only differ in when they are applied, not how they work.
How do the settings files work?
A typical settings.json file looks something like this:
{
  "permissions": {
    "allow": [
      "Bash(mv \"content/posts/automating-blog-reviews-with-claude-skills.md\" \"content/posts/automating-blog-reviews-with-claude-skills/index.md\")",
      "Bash(hugo *)",
      "WebSearch",
      "WebFetch(domain:gohugo.io)",
      "WebFetch(domain:github.com)",
      "Bash(git *)",
      "Bash(winget search *)",
      "Bash(winget install *)"
    ],
    "deny": [],
    "ask": []
  }
}
This example is from my settings.local.json file for this blog. So the one not being tracked by Git. It has the sections deny, ask and allow. I listed them in the order they are applied. So if something is listed in both deny and ask, it will be denied. This leads us to the first tip:
💡 Use the “deny” list to prevent Claude Code from running undesired commands
Another thing to notice in the example, is the first line. It looks weird and very specific. That is because I used the option to “Always allow” when Claude asked me, rather than write it myself in the list. And that is the second thing I want to emphasize. Manually maintaining the permissions list is more work (initially at least), but it yields much better results. Which leads us to the next tip:
💡 Prefer manually modifying
settings.json- instead of using the “Always allow” option from the prompt
Manually maintaining your settings files will allow you to set just the right boundaries for Claude to a point where it (almost) never have to ask for permission. And when it does, you will take it more seriously, than when you get asked every other prompt.
And if you have already used the “Always” allow option in the prompt, don’t worry. That option simply adds a line to the projects settings.local.json file, where you can remove it again.
How do I build a good list of permissions?
Permissions, while reducing friction, can increase risk. So exactly where the line should be drawn, depends on the individual developer and the specific project. There is no single right answer!
There is however, a single (almost) universal rule. Which leads us to another tip:
💡 Always manage project scoped permissions in
settings.local.json(the one that is not tracked by Git)
This has almost no downsides, it only means that new developers has to configure their own settings.local.json file, once they are onboarded. But this is a one time thing. The benefit is that it helps mitigate risk. If permissions has become too relaxed, they aren’t automatically transferred to other developers. In other words, the impact of adding a “wrong” line to permissions, is limited.
That means that the choice, when adding a new permission, is whether it should be user or project scoped. The answer to which, will almost always be the classical developer answer: “It depends”. A good starting place is to ask yourself if this command is one you exclusively use in the specific project. If it is, and if you find it safe, you can add it to the allow list in settings.local.json. Or likewise add a command you don’t trust, to deny. Often though, you will find that it is a command you need in all projects. Things like git and dotnet is rarely limited to use in a single project, so I prefer to add them to my user level settings.json file.
💡 Always start by considering if a new permission can be limited to a specific project
Adding new permissions
Once you have decided where, the next step is how. Let’s say for example we want to allow Claude to use git, except for deleting branches, in which case you want it to ask. And it should apply to all projects (user level). For that we need to add two lines to ~/.claude/settings.json:
{
  "permissions": {
    "allow": [
      "Bash(git *)"
    ],
    "ask": [
      "Bash(git branch -D *)"
    ],
    "deny": []
  }
}
The * is a wildcard, meaning that all commands which starts with git (followed by a space) will be allowed. But remember that ask is evaluated before allow, so anything starting with git branch -D will require Claude to ask, despite it matching both patterns.
Building iteratively
The last advice for this post, is to build these lists iteratively. Whenever Claude asks you for permission to execute a command, stop and read exactly what is asks. If it’s something you want to always allow, either at project level or user level, open the relevant settings file and add a line which matches the command. Use the wildcard symbol (*) to avoid overly specific permissions, like the first permission in the first example. It will slow you down initially, but as your permissions becomes increasingly precise to your specific need, it will boost your development speed greatly.
For the full reference on permission rules, modes, and syntax, see the official Claude Code permissions documentation.